Comprehensive Methods for Testing Sealing Performance of Storage Cabinets
This guide explains practical ways to test how well storage cabinets keep dust, moisture, and stray airflow out, from simple at-home checks to quantitative pressure and leak tests adapted from packaging, building, and electrical cabinet standards.
Ever opened a glass cabinet to admire a grail figure only to find a ghostly film of dust on her hair and cape even though you “sealed” the doors last weekend? Borrowing leak tests that can spot gaps as small as about 0.002 inches from industries that protect food, medicine, and critical electronics lets you catch those invisible leaks before they haze a whole shelf of PVC and resin heroes. The methods below show how to move from simple flashlight and soap tests all the way up to pressure, tracer-gas, and certification-style checks, so you can match the approach to your cabinets, budget, and the value of the collection inside.
What “Sealing Performance” Really Means For A Figure Cabinet
A “sealed” storage or display cabinet is never about magic; it is about controlling the paths where air can move. Packaging engineers talk about seal integrity as the difference between a product staying protected and moisture or oxygen slipping in to cause damage over time, and the same logic applies to your figure shelves where unwanted air brings dust, humidity, and pollutants to delicate surfaces.
In buildings, a dedicated airtightness test uses a fan to pressurize the space and measure how much airflow is needed to hold a small pressure difference, usually around 0.2 to 0.4 inches of water column, so designers can quantify how leaky the envelope really is rather than guessing from drafts. A building airtightness test with a blower door is a standard example of fan pressurization used exactly this way, with airflow versus pressure data revealing the quality of the air barrier.
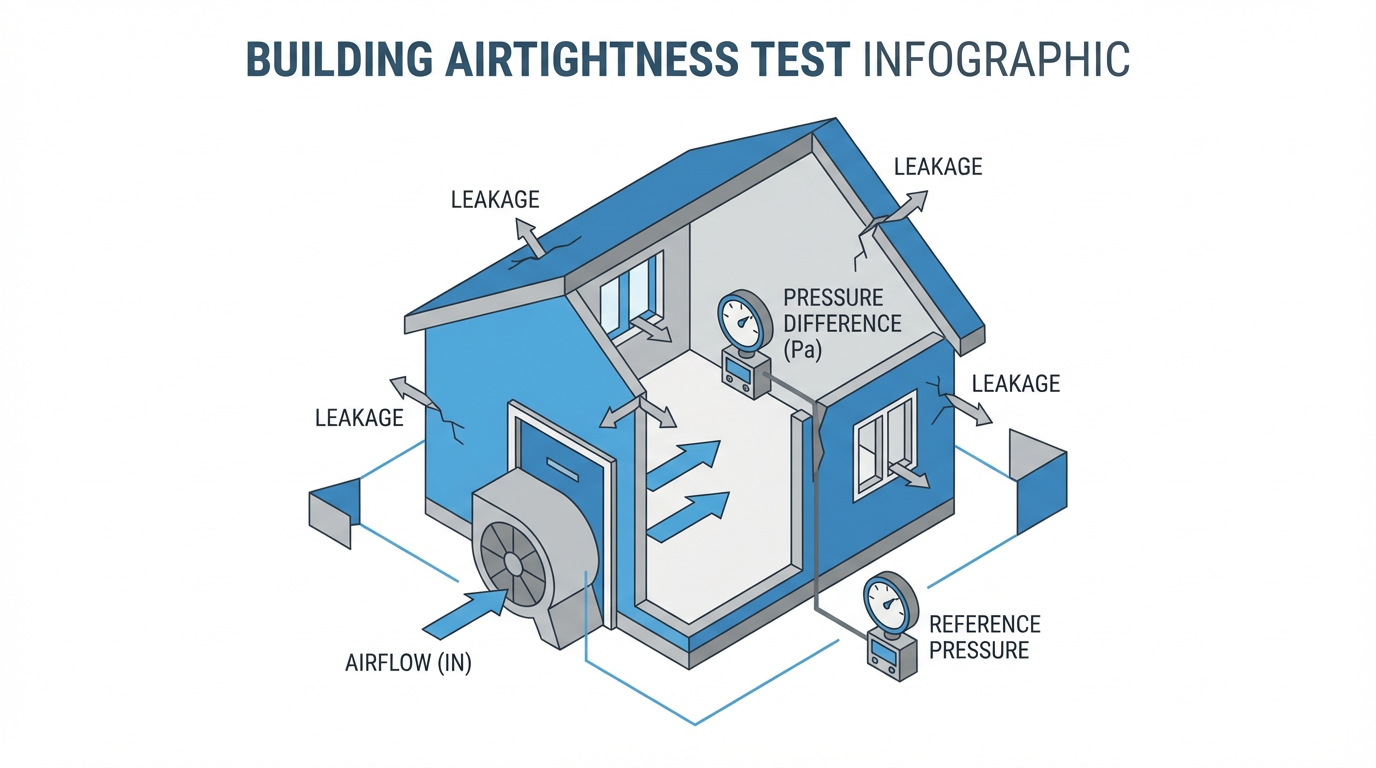
Building airtightness testing shows how even small gaps add up to big leakage, which is the same story when you magnify the perimeter of every door and panel on a cabinet.
For storage cabinets, sealing performance is therefore not only about the gasket but also about door alignment, latch compression, panel rigidity, and finish. Poorly built kitchen cabinets with awkward boxes, misaligned doors, and visible gaps are classic signs of cheap work, and those visual flaws usually go hand in hand with air and dust leaks that frustrate daily use. The warning signs of a cheaply flipped kitchen—sloppy joints, crooked doors, and inconsistent gaps—show how build quality and sealing tend to rise and fall together. Warning signs of a cheaply flipped kitchen illustrates how gaps and shortcuts show up long before outright failure.
Two Big Families Of Seal Tests
In the broader world of leak detection, seal tests cluster into two families. Deterministic methods give direct, quantitative results such as measured leak rates or peel strengths; probabilistic methods depend on observation and a bit of chance, such as watching for bubbles or dye streaks.
Packaging leak specialists explicitly group seal integrity tests into deterministic and probabilistic methods, with vacuum decay and ultrasonic tests falling into the deterministic category and visual inspection and bubble tests into the probabilistic category. This distinction matters because deterministic methods give repeatable numbers that are easier to compare over time or between cabinets, while probabilistic tests are quick and practical for everyday checks but sensitive to the operator’s eyes and habits. An industry overview of different types of seal integrity test methods highlights exactly this tradeoff between direct measurement and observation-based checks. Different types of seal integrity test methods stresses that deterministic approaches are preferred where objective verification is critical.
For a figure collector or custom-cabinet maker, probabilistic tests like soap bubbles and smoke are typically the starting point. As the stakes rise—think climate-controlled vaults for prototypes, archives, or one-off statues—deterministic methods such as vacuum decay or tracer-gas tests become more appropriate.
Probabilistic Tests You Can Actually Do At Home
Visual, Paper, And Light Checks For Obvious Gaps
The first pass is purely visual but should be ruthless. Close the doors gently and look along the edges against a bright background, watching for slivers of light, uneven reveal lines, and doors that twist or bind. In the same way that misaligned doors, gappy trim, and exposed fasteners signal a cheap flip in a kitchen, they also show where air is most likely to sneak into your storage cabinets. The signs of awkward cabinets in low-budget remodels—doors that do not meet cleanly and inconsistent gaps—are the same weak spots that sabotage sealing.
A practical upgrade is to close a strip of thin paper in the door all around the perimeter. Where the gasket and hinge geometry are working well, the paper should drag firmly but pull free without tearing; places where it slides out effortlessly or is not gripped at all deserve closer scrutiny. A powerful flashlight held inside the darkened cabinet, with the room lights off, can then highlight hairline leaks as surprisingly bright beams.
DIY Bubble Testing With Gentle Pressurization
If you want to move beyond guesswork, bubble testing is one of the most satisfying upgrades. The idea is to gently pressurize the cabinet and then spray a thin film of soapy water over seams and joints; any leak will blow small, visible bubbles.
Experienced speaker builders recommend laying the cabinet on its back on spacers and using a vacuum cleaner hose set to blow, but only loosely connected, so the interior is slightly pressurized rather than forced to full blower pressure. They spritz a light mist of soapy water along joints and seams, emphasizing that the surface should not be soaked and that gentle cleaners are important for protecting the finish. Under pressure, leaks show up instantly as small clusters of bubbles at the exact leak site, which is far more precise than following smoke trails.

Advice on pressure checking cabinets in the audio world describes combining a loose blower connection and a mist of mild soapy water to reveal pinhole leaks as distinct bubble points. Pressure checking speaker cabinets walks through this approach.
For a glass or wood figure cabinet, the same concept works if you respect the materials. Keep the hose connection loose so you can still pull it away with two fingers, apply only a thin mist of diluted soap on metal frames, gasketed edges, and hardware penetrations, and immediately wipe dry afterward. A real-world example is a glass cabinet with a persistent dust stripe along the bottom shelf: a light bubble test may reveal a foaming line along the hinge side where the door frame barely kisses the gasket.
Smoke And Incense: Why They Often Disappoint
Smoke testing is the classic trope, but it is surprisingly easy to misread. Incense smoke will drift toward strong leaks, yet when there are many possible leak points and complex air currents around the cabinet, the plume can blur and fail to pinpoint the culprit. Leak hunters working on speaker cabinets call incense inadequate when there are many small potential leak paths, comparing it unfavorably to the clarity of bubble patterns under pressure. The discussion on pressure checking cabinets notes that smoke tends to be a coarse, “direction only” tool rather than a precise locator of hairline gaps.
Smoke is therefore best treated as a rough indicator that a cabinet is leaky somewhere, not as your primary diagnostic. If you see obvious smoke movement near a seam, follow it up with bubble testing along that strip to find the exact pinhole.
Deterministic Methods For Serious Builders And Custom Enclosures
Bubble, Dye, And Vacuum Methods From Packaging
Industrial packaging relies on defined standards to prove that seals keep contaminants out over a product’s entire life. Several ASTM methods form a toolkit that can be adapted conceptually to cabinets.
Visual inspection of seals is codified as a gross-defect check for flexible packaging, but it is explicitly recognized as low sensitivity that must be backed up by more capable methods. Dye penetration tests for porous and nonporous packages use a colored liquid along the seal area to reveal tiny continuous channels, with detection down to apertures of about 0.002 inches, which would be invisibly small in a cabinet gasket but very real for long-term dust ingress. An overview of ASTM packaging standards for seal integrity explains how dye methods and related tests fit into a complete integrity strategy. ASTM packaging standards for seal integrity and leak testing summarizes these techniques and their capabilities.
Bubble emission tests in packaging slightly pressurize a flexible package and submerge it in water; any leak shows up as a rising stream of bubbles. The technique reliably finds holes around 0.01 inches in diameter, which is relatively large but excellent for catching gross leaks and seal misses. For cabinets, you obviously do not dunk a wooden case, yet you can still borrow the idea by locally applying a soap film and pressurization, as with the DIY bubble test, while recognizing that your detection threshold is similar: excellent for pinholes and small cracks, less so for diffusion through porous materials.
Vacuum decay, by contrast, is fully deterministic. A sealed container is placed under vacuum in a rigid chamber, and sensors track how much the pressure drifts over time, converting that into a leak rate. This method is nondestructive and sensitive enough for pharmaceutical vials and sterile medical packages, and it is recognized in regulatory guidance as a preferred approach to container closure integrity. The same ASTM overview describes vacuum decay as a cornerstone method for quantitative seal integrity testing.
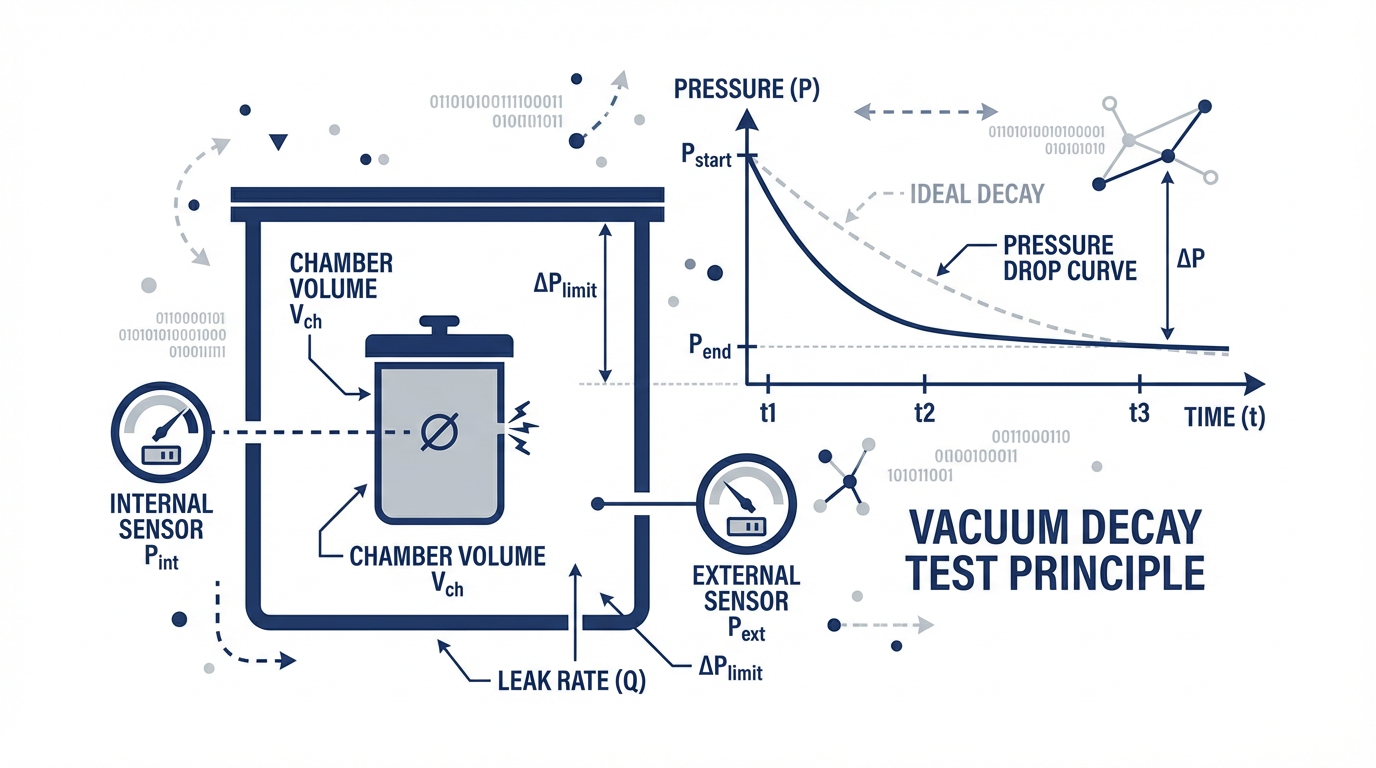
ASTM packaging standards for seal integrity and leak testing details how vacuum decay converts pressure change into leak-rate data.
For a storage cabinet, a true vacuum-decay setup is usually overkill, but the philosophy applies. A simple version is to slightly pressurize the cabinet, then watch a sensitive manometer connected across the door; the rate at which pressure falls gives a comparative sense of leakage between cabinets or before and after gasket upgrades.
Tracer-Gas And Helium Leak Testing
When the stakes are very high, tracer-gas methods step in. Helium leak testing uses helium as a tracer because its tiny molecules slip through extremely small leak paths; sensitive detectors can pick up minute amounts exiting the enclosure. Industry standards describe helium tracer methods as suited for high-value, high-risk packages such as pharmaceutical vials and sealed electronics, where even microscopic leaks can be unacceptable. The same ASTM overview includes helium leak testing as a specialist option with extremely high sensitivity but higher cost and equipment complexity. ASTM packaging standards for seal integrity and leak testing notes helium methods as the top of the sensitivity ladder.
A typical procedure for validating a sealed enclosure is to pressurize it with helium, allow time for any leaks to admit the gas, and then monitor for helium escaping later. If the detector measures helium above a defined threshold, the unit fails the sealing criteria; if not, the enclosure is considered adequately sealed for that application. This type of test is realistically laboratory territory, but if you are designing a purpose-built archive cabinet for one-of-a-kind statues or original art, it can be worth partnering with a lab that already runs helium tests for electronics or medical devices and having them treat your cabinet like any other high-value enclosure.
Fan Pressurization For Cabinets And Rooms
Fan pressurization tests are the bridge between whole-building airtightness and smaller cabinets. At the building scale, a calibrated fan temporarily installed in a doorway pushes air in or out while pressures across the envelope are measured, and the airflow required to maintain a target pressure difference is used to calculate leakage. Guides on building airtightness test methods describe how fan pressurization, pressure monitoring, and enclosure-area normalization work together to produce comparable airtightness metrics. A technical description of building enclosure airtightness compliance testing gives examples of test setups and reporting metrics using airflow per square foot of enclosure area. Test method for building enclosure airtightness compliance testing illustrates how fan tests quantify leaks.
For storage cabinets, you can adapt the idea by building a small “mini blower door” panel that fits a cabinet opening, mounting a quiet fan and a pressure tap in it. Pressurize the cabinet to a small, safe level and record the airflow or fan setting needed to hold that pressure. Repeating the test before and after adding better gaskets or adjusting latches makes the improvement visible, even if you do not reduce everything to formal metrics.
If your cabinet is part of a roomwide, dust-controlled space, combining a miniature cabinet test with a room-level blower-door test gives a fuller picture. Resources on achieving airtightness in buildings show how careful detailing and testing capture sneaky leaks, and the same mindset pays off when you want a whole hobby room that behaves like a giant protective case. An illustrated guide to achieving airtightness in building envelopes explains how planned testing at key stages catches issues while they are still easy to fix. Illustrated guide to achieving airtightness serves as a big-picture reference.
Testing The Supporting Cast: Seals, Latches, And Structure
Seal Strips And Gasket Materials
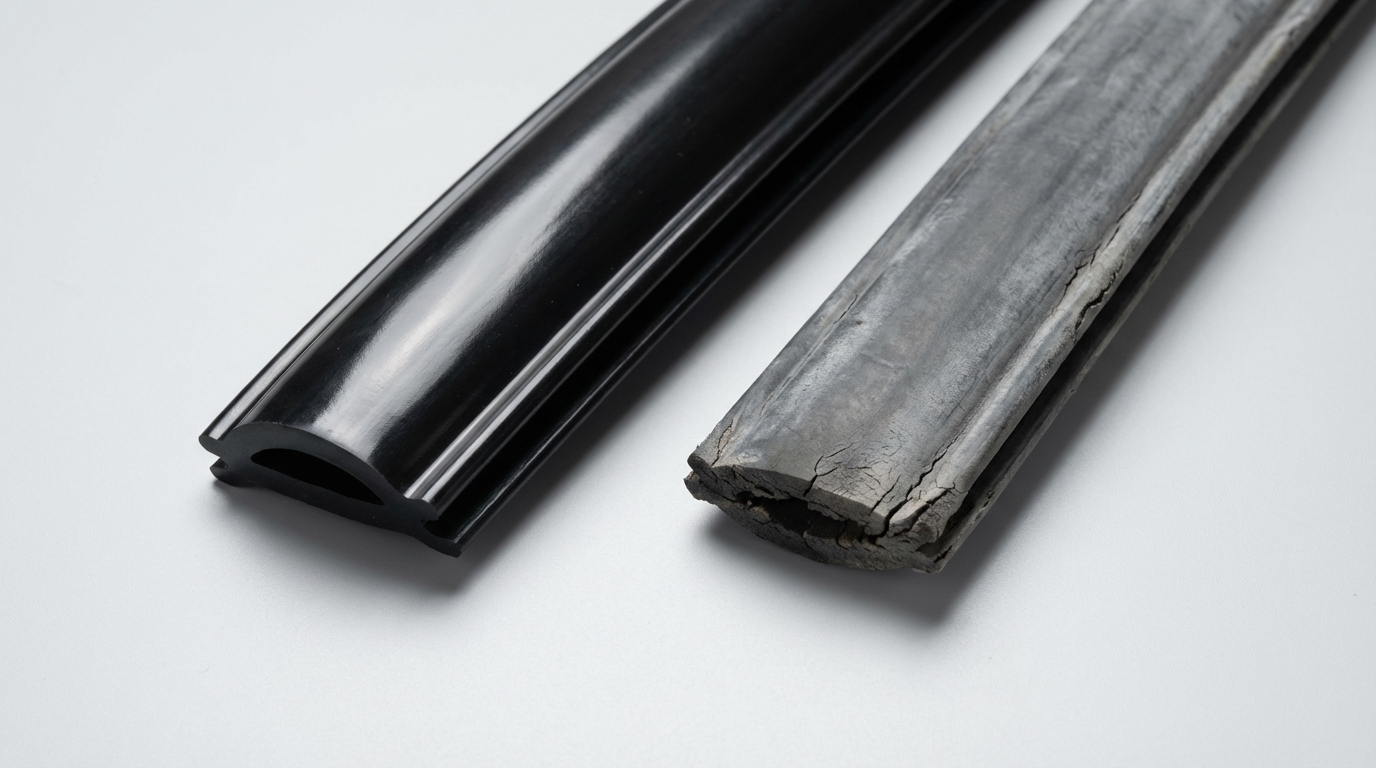
Even the fanciest pressure test will not save a bad gasket. Cabinet sealing strips—flexible gaskets around doors and panels—are critical for blocking air, water, dust, and noise and are widely used in everything from appliances to building doors and windows. A technical overview of cabinet sealing strips describes how quality materials like EPDM rubber and thermoplastic elastomers provide high elasticity, kink resistance, and strong sealing performance. How to identify the cabinet seal is very important lists the functional benefits of well-designed seals.
Practical checks for gasket quality go beyond just “does it feel soft.” One way to screen low-grade strips is to smell them; high-quality PVC should have only a slight, mild odor, while strong or unpleasant smells can signal high filler content or unsafe additives. Another method is to wrap a strip tightly on a profile and expose it to high heat, then inspect for staining, oily residue, or discoloration migrating from the gasket, all of which indicate poor stability. The same source recommends avoiding strips that look dull and chalky, since loss of gloss often tracks with lower durability and poor long-term sealing.
Guidance on identifying good cabinet seals highlights odor, surface appearance, and aging behavior as practical field checks. How to identify the cabinet seal is very important ties these observations directly to performance.
For figure cabinets, this means you should be as picky with gasket quality as you are with paint finishes on a prize figure. A sticky, smelly strip that leaves residue on your fingers when compressed is a red flag; a stable, elastic gasket that rebounds quickly and shows no blooming after heat exposure is more likely to hold a tight seal for years.
Latch Performance And Door Compression
Latches are the unsung heroes that actually clamp the door against the gasket. In electrical and outdoor cabinets, latch performance is tested for mechanical strength, cycle durability, sealing effectiveness, vibration resistance, corrosion resistance, ease of operation, and security, all aligned with standards like IEC ingress ratings and NEMA enclosure types. A dedicated guide to testing latch performance explains how dust chambers, water spray or immersion, and pressure tests verify that a latch can maintain environmental ratings such as IP66 or NEMA 4X under real-world stresses. How to test latch performance for electrical cabinet reliability outlines these evaluations.
Cycle tests often run latches through tens of thousands of open and close operations, while vibration and shock tests expose them to random and sinusoidal profiles to check for rattling, loosening, or unintended opening. Corrosion resistance, commonly assessed with salt spray tests over many hours, ensures the latch does not rust and lose force in damp environments. The same source recommends defining test requirements and pass or fail criteria early, building representative fixtures, and combining tests such as vibration plus temperature to reveal subtle failure modes. How to test latch performance for electrical cabinet reliability emphasizes that real reliability comes from this full-lifecycle view.
For a display cabinet, you might not need military-grade vibration profiles, but you absolutely want a latch that closes smoothly with consistent compression over time. If the door can be pushed in and out while latched, or if a slight bump makes it rattle, that is mechanical evidence that the seal is not being held evenly and will likely leak dust.
Structural Durability, Finish Quality, And Long-Term Sealing
Sealing performance is fragile if the cabinet structure moves or the finish fails. The KCMA A161.1 quality certification program for kitchen and bath cabinets is a good illustration of how durability testing supports long-term function. Certified cabinets go through more than a dozen lab tests that load shelves and bottoms at significant weights for a week, load wall cabinets to hundreds of pounds, and swing doors for 25,000 cycles while also dropping steel balls on shelves and drawer bottoms. The KCMA quality cabinet certification standard spells out these structural and operational tests as part of a broader performance program. KCMA Quality Cabinet Certification describes how cabinets must withstand these challenges.
Finishes are also exposed to heat around 120°F at elevated humidity, cold down to about -5°F after hot conditioning, and common kitchen spills like juices, ketchup, coffee, olive oil, and high-proof alcohol for 24 hours, with mustard applied for a shorter but intense staining exposure. Doors and panels must show no unacceptable damage after these trials, ensuring that long-term appearance and cleanability are preserved even under abuse. The same KCMA standard details how these household-substance tests help verify finish performance on exposed surfaces. KCMA Quality Cabinet Certification lists the liquids and exposure durations.
For collectors, cabinets that have been built to survive that kind of punishment are more likely to keep their geometry and tightness after thousands of door openings and occasional spills during late-night display rearranging. A cabinet box that stays square and a finish that resists swelling and warping mean the door and gasket meet consistently, which is fundamental to any sealing test you run.
Comparing Key Test Approaches
Approach | Type | Approximate sensitivity | Typical use case | Pros | Cons |
|---|
Visual, paper, and light checks | Probabilistic | Large gaps you can see or feel | Everyday figure cabinets | Free, instant, no gear | Misses fine leaks and subtle gasket issues |
Soap-bubble test with pressurizing | Probabilistic | Pinholes and small cracks around 0.01 inches | DIY leak hunting around doors and seams | Highly visual, low cost, re-testable | Needs care with finishes and gentle pressurizing |
Dye and bubble methods from packaging | Probabilistic with defined procedure | Channels down to about 0.002 inches in adapted form | Lab setups and critical seals on small enclosures | Well-understood behavior, clear defect visibility | Hard to adapt directly to large wooden cabinets |
Vacuum decay leak testing | Deterministic | Very small leaks with quantified rate | Medical, pharma, or electronics-style enclosures | Nondestructive, numeric leak-rate data | Specialized chambers and instrumentation |
Helium tracer-gas testing | Deterministic | Extremely small leaks | Highest-value, mission-critical enclosures | Maximum sensitivity, detailed leak mapping | Highest cost, needs expert lab support |
Fan pressurization | Deterministic | Whole-cabinet leakage as cfm per area | Cabinets integrated into controlled rooms | Comparable metrics over time and designs | Requires fans, sensors, and careful setup |
Choosing A Test Strategy For Your Collection
For most anime collections in typical apartments, the sweet spot is a combination of sharp visual inspection, paper and light checks, and a gentle soap-bubble test on the main seams and hardware penetrations. That level of testing quickly identifies the “big villains” such as warped doors, under-compressed gaskets, and poorly sealed cable pass-throughs while staying safe for furniture-grade finishes.
If you are commissioning custom cabinets or modifying existing ones with upgraded seals and latches, it is worth stepping up to more structured tests. A standardized bubble procedure, basic pressure monitoring, and periodic retesting after hardware adjustments turn sealing into a quantifiable design parameter instead of a vague hope. Drawing inspiration from HVAC cabinet air leakage test methods that treat the cabinet box as a mini building envelope gives you a mindset where leaks are measured, not guessed, and where better designs can be proven over time. An overview of HVAC cabinet air leakage test methods from the energy-efficiency world reinforces this emphasis on measuring leakage to improve performance. HVAC cabinet air leakage test method offers a parallel from mechanical systems.
For archivists, studios, or collectors managing museum-level pieces, partnering with labs that already run vacuum decay or helium tracer tests for packaging or electronics brings your cabinets into the realm of engineered enclosures. At that level, the cabinet is no longer just furniture; it is a protective system with defined leak-rate limits, lifecycle-tested latches, and well-characterized gaskets that you can trust to keep environments stable for years.
A well-tested, tightly sealed cabinet is the quiet guardian of your collection, keeping dust, humidity, and chaos on the outside so your favorite heroes, idols, and mecha can stay frozen in perfect condition on the inside. Treat your cabinets like serious containment gear rather than just pretty boxes, and every time you slide a door open to admire a flawless figure, you will feel the payoff of all that careful leak testing.