Understanding the Causes of Luminous Paint Failure on Figurines
Most "failed" glow effects on anime figurines come down to four things: overpowering room light, blocked or damaged pigments, bad layering, or heat and wear slowly killing the glow. Treating luminous paint as a specialty material with specific limits and workflows turns those weak effects into reliable, readable light in the dark.
Your favorite demon girl's scythe was supposed to blaze neon green at midnight, but instead it barely smolders for a few seconds before fading to a sad smudge on the shelf. That sinking feeling is common in the hobby, especially after hours spent on airbrushing, decals, and sealing. The good news is that knowledge borrowed from safety markings, industrial glow powders, and miniature glow techniques can give you glow that reads clearly in the dark and survives handling; this guide walks through the main failure modes and the fixes that work on real figures.
How Luminous Paint on Figurines Really Works
Luminous coatings used in safety and infrastructure are engineered to soak up light and release it slowly in the dark, acting as tiny rechargeable light batteries in a paint film. Research on pigment pastes explicitly frames them as paints that absorb light energy and then emit it later to save electricity on signs and markings, as in Pigment pastes engineered to absorb energy and emit light in the dark, which operate on the same physics as the glowing eyes and spell circles we put on shelves.
In materials science, luminous paints are grouped into three broad families: fluorescent paints that light up only while exposed to strong light; phosphorescent "glow-in-the-dark" systems that keep glowing after the lights go off; and older radioluminescent mixes that used radioactive sources and are now avoided for safety. Modern hobby and road-marking products almost always use non-radioactive phosphorescent powders suspended in a regular paint binder, so your figurine glow behaves more like a tiny emergency exit sign than an LED strip.
Even centuries ago, artists were already wrestling with how pigments hold up on small figures. Studies of Roman-era figurines and sculptures show tiny traces of pigments still clinging to terracotta and stone, uncovered through imaging rather than the naked eye, which reveals how much color can change or vanish over time even when material remains in place. Analyses of Roman color materials on terracotta figurines and other artifacts echo what happens on a PVC idol whose glow slowly dulls while the pigment is technically still there.
For figurine work, that means three practical things.

First, the glow pigment itself is only one piece; the binder and primer matter just as much. Second, the glow is subtle and needs darkness and contrast to read. Third, expectations shaped by LEDs and anime key art can be wildly out of sync with what a paint film can physically do.
When the Glow "Fails" Because the Room Is Too Bright
The most brutal truth: a lot of "bad" glow paint is actually fine; it is the viewing conditions that fail. Tests on glow powders show that even when fully charged, their initial brightness is only on the order of a few candelas, and as they sit in darkness for an hour their output drops to a tiny fraction of typical indoor lighting levels, as discussed in Measured luminous powder brightness drops from a few, while common room lighting sits hundreds of times higher.
Human eyes can only perceive that glow if the surrounding brightness is lower than the light the paint emits. That is why manufacturers of luminous powders explicitly warn that in very bright environments, like fire scenes or heavily lit urban areas, glow effects become functionally invisible even when the pigments are technically glowing. Analyses of ambient brightness and luminous materials conclude that the best environments are almost completely dark or enclosed. On a practical shelf, that means a glass case with the room lights off, a dark hallway, or a nightstand after your phone screen goes dark, not a figure baking under a daylight desk lamp.
Real-world infrastructure proves the point. Photoluminescent highway and bike-path markings are sold on the promise of glowing lanes for eight hours or more after a daytime charge, but they are specified to work in darkness, not under floodlights. Buyer guides emphasize that the coatings must provide several hours of visible afterglow and hit adhesion and abrasion targets around road traffic, but all of that assumes the surrounding environment is relatively dark so the glow can stand out. Photoluminescent highway paints designed for at least eight hours of visibility are impressive, yet if you dropped that technology onto a brightly lit freeway it would simply be washed out.
Translated back to anime figurines, a few key behaviors make or break perceived brightness. First, charge the piece properly, ideally under a strong light source for several hours before you judge it. Second, view it in a genuinely darkened room and let your eyes adjust rather than glancing while the monitor or room lamp is still blasting. Third, give the glow contrast: a pale, luminous rune ring on a dark matte base reads far stronger than the same ring surrounded by light armor panels and a bright backdrop. When fans say "the paint doesn't work," half the time the pigment is fine and the display is just too bright.
Thick, Chalky, or Peeling: When the Paint Film Itself Fails
Glow pigments are mineral powders, so they behave very differently from normal fine art pigments if they are packed too heavily or trapped in an incompatible binder. One industrial overview, Glow-in-the-dark powder, described as a special mineral pigment, notes that these powders must withstand processing and environmental stress; push them beyond their comfort zone and they harden, change color, and lose performance over time. That same "rock dust in a film" reality is what you feel as sandy or chalky texture on a figure.
Modelers have bumped into this when trying to fake aircraft formation lights with fabric-grade glow paints. One hobbyist describing glow acrylics sold for clothing found that the paint was extremely thick, hard to apply smoothly, and reluctant to adhere cleanly to hard plastic until it was thinned with a compatible acrylic product; after that, multiple layers were needed, which left a visibly raised strip instead of a flush panel line. Experiments with glow acrylic paint marketed for fabrics show almost exactly what happens when a glow coat on a figurine looks lumpy or starts to chip along edges.
Under the hood, this is all about the binder. Acrylic mediums are made from the same base materials as acrylic paints, so they can be mixed into paint or used as clear varnish without weakening the paint film. They change properties like flow, finish, and working time but remain chemically compatible, letting artists extend drying time or add shine without encouraging cracking or flaking. If your luminous paint feels like cottage cheese or is hard to brush, cutting it with a clear acrylic medium from the same system is usually safer than reaching for random solvents.
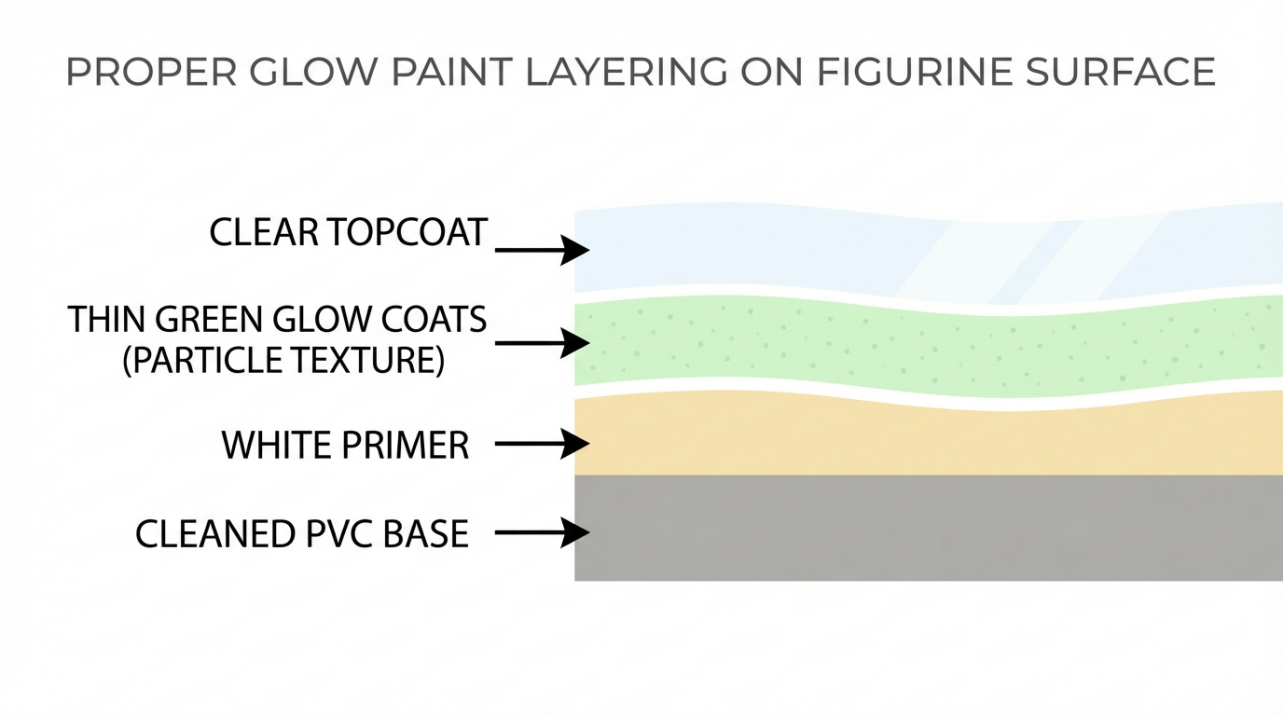
Infrastructure specs again underline how important adhesion and film strength are. Photoluminescent road paints aimed at highways call out minimum adhesion on asphalt or concrete of roughly a few hundred psi and abrasion resistance high enough to survive hundreds of standardized wear cycles, because a glow that peels off the pavement is useless. While figurines never face that abuse, the same logic applies: if you slap dense glow pigment over an unprimed PVC wing, do not key the surface, and then lock it under a brittle clear coat, peeling is almost inevitable.
On a shelf, reliable glow coats usually share a few traits. The figure is properly cleaned and primed so the binder actually grabs. The glow layer is applied in several thin coats rather than one thick cake, with drying time in between to keep it from behaving like impasto that never really cures. Any final varnish is either a compatible acrylic medium or a known-safe topcoat instead of a mystery spray that might attack the binder. When the paint layer itself is sound, the glow can fade gracefully over years instead of flaking off in weeks.
Heat, Time, and the Slow Death of Glow
Heat is the silent killer that few hobbyists think about until a prized figure has sat in a sunlit window or a hot attic for a couple of summers. Testing of glow powders shows that temperature has a big impact on performance: at lower temperatures the glow tends to be more stable and brighter, while higher temperatures start degrading the pigment's structure and efficiency. Manufacturers of regular grades of glow powder report that they tolerate only about 120-175°F before their luminescent properties begin to deteriorate, and prolonged exposure can make them fade, discolor, or even lose their glow entirely.
There are heat-resistant and ceramic-grade powders meant for firing in kilns at extreme temperatures, but these are specialized products and even they have upper processing limits below what some markets casually claim. Ceramic glazes that glow in the dark mix these powders into base glazes and are categorized by firing temperature, with guidance to stay within a defined firing band to avoid destroying the luminance. The takeaway is simple: glow pigments are not invincible, and your PVC statue is not a kiln tile.
On figurines, heat damage creeps in a few familiar ways. Displaying a glow-heavy piece in direct sunlight through a window, especially behind glass, can raise surface temperatures more than it feels by touch while also dumping UV on the paint, accelerating breakdown. Using a heat gun or hair dryer aggressively to speed-dry layers right on the glow coat risks pushing parts of the film into the danger zone repeatedly. Storing a collection in a hot garage or attic where temperatures spike during summer can slowly cook both the binder and the pigment. You may notice that a figure that once flared brightly now only hints at glow, even though the paint looks intact in daylight.
The safest practices are straightforward. Treat glow-painted surfaces like you would a prized high-end resin garage kit: keep them out of strong sun, avoid baking them in enclosed cars or attics, and be gentle with forced heat during painting. If you need to speed drying, favor moving air over high heat and let layers cure fully before sealing. That will not make the glow immortal, but it drastically slows down the silent fade.
Short-Lived Glow: Expectations Versus Physics
Another common frustration is a glow that starts strong and then drops off faster than expected. Here, it helps to compare product classes. Some persistent phosphors used in industrial and safety applications can maintain visible afterglow for roughly 5 to 30 hours in lab conditions, depending on composition and excitation. Those are premium pigments optimized for longevity, not the small bottles sold in craft aisles. By contrast, consumer glow paints aimed at crafts and kids' rooms often promise only a couple of hours of visible glow after charging, and hobby reports of glow effects that last just a minute or two when using thick fabric paints on models fit that pattern.
Highway and bike-path markings targeting eight to twelve hours of visibility after daylight charging still emphasize the importance of choosing formulas with proven brightness retention over time, combined with good adhesion and weathering, because a long-lived glow is part material choice and part coating design. Performance benchmarks for glow-in-the-dark highway paints therefore include minimum brightness levels after specified times, along with durability requirements. If a figurine product uses a cheaper pigment blend or packs a lot of filler and extender into the binder, there simply may not be enough active phosphor to sustain more than a brief flare.
Practically, that means you should calibrate expectations by where the paint sits on this spectrum. If a bottle's marketing copy is vague, assume it behaves like a decorative craft paint: great for a little sparkle when the lights go off, not an all-night beacon. Applying more coats does help up to a point, as manufacturers of premium glow acrylics recommend two to five layers for an even, streak-free glow across a primed surface, but beyond that you can end up with thick, brittle films that crack or look muddy in daylight. The sweet spot on a figure is usually enough layers for an even glow on top of a bright, smooth undercoat rather than a mountain of paint.
Choosing Between True Glow, Painted Light, and Electric Tricks
Once you understand what glow paint can and cannot do, a big design decision emerges: when should you rely on real glow, and when should you fake it with painted light or electronics?
A lot of miniature painters now lean heavily on "object source lighting" (OSL), where the glow is painted with normal opaque and translucent paints so that a torch, magic circle, or set of eyes appears to cast light onto nearby surfaces. Guides such as Object source lighting on miniatures emphasizes making the note that the light source needs to be the brightest spot, the nearby lit areas must be lighter than they would be in shadow, and the glow should fade with distance in straight lines, just as real light does. On anime figures, that can mean painting a sword core almost white-yellow, then feathering colored light onto armor edges and hair to suggest an energy blade, even before any glow pigment is involved.
Glow paint works beautifully as an accent on top of that. Guides on painting auras and glow effects in fine art recommend building radiance with smooth gradients and transparent glazes, then optionally layering thin coats of phosphorescent paint over the brightest areas so they softly light up in the dark. Techniques for painting auras and glow call for translucent layers and placing phosphorescent paint only over the brightest regions to keep the color vibrant while adding a subtle night-time effect. On a figure, that might be a sigil on a base or the center of a spell circle: it reads convincingly in daylight because of the painted OSL, and then gives a gentle extra kick when you turn the lights off.
Electroluminescent (EL) paint and panels are another temptation, especially for mecha and sci-fi figures. DIY EL paint recipes, as in DIY electroluminescent paint setups require specialized powders, dielectric, involve finely powdered electroluminescent phosphor, barium titanate as a dielectric, expensive transparent conductive layers, and a dedicated DC-to-AC inverter to drive the whole stack. That is a fun engineering project for a centerpiece display, but it is overkill for most collections and demands careful safety practices and room inside the base for electronics.
A simple way to decide is to let function drive form. If you want a figure that looks incredible on the shelf in normal light and only occasionally glows, prioritize painted OSL and use glow paints sparingly on the hottest spots. If you need a specific symbol or edge to be legible in the dark for several hours, invest in higher-performance glow products and design the base so the glow is big, simple, and surrounded by dark surfaces. Reserve EL or LEDs for those "center of the collection" builds where wiring, switches, and power are worth the effort.
Here is a quick comparison that helps frame the trade-offs.
Approach | Brightness and timing | Complexity and cost | Fit for anime figurines |
|---|
Photoluminescent paint | Subtle glow that fades over minutes to a few hours; stronger in darkness and after full charging | Similar to regular painting, but needs careful layering and compatible binders | Great for runes, eyes, and symbols that get viewed in dim rooms |
Painted OSL with standard paints | No real glow, but visually striking in any light; relies on contrast | Requires practice with gradients and color theory; no special materials | Ideal when you want dramatic "anime key art" lighting all the time |
Electroluminescent paint or panels | Actual self-lit surfaces while powered; can be bright and steady | Needs specialized materials, safety gear, and power electronics | Best for a few showpiece builds with room in the base for hardware |
A Practical Workflow for Reliable Glow on Figurines
On the workbench, a glow-friendly workflow feels like a mash-up of miniature painting and gentle materials science. Start by planning where the glow truly matters; pick a few focal points rather than trying to coat the whole figure. Clean and prime the surfaces so the binder has something to bite, then build a bright, smooth undercoat in a light color where the glow will sit. That undercoat does the same job that a white or light primer does for highway and safety markings, which are specified to be applied over high-contrast, well-prepared substrates so the glow pigments have maximum visibility.
Next, treat the glow layer as a glaze, not wall paint. Thin thick glow acrylics with a compatible clear acrylic medium instead of straight water so the film stays strong while the pigment spreads more evenly, reflecting how artists use mediums to adjust flow and finish without compromising the paint film's integrity. Using acrylic mediums that share the same base resin as the paint helps keep the film flexible while still letting you control thickness. Apply several thin coats, letting each one dry fully, and stop once the glow looks even when charged rather than chasing brightness with ever-thicker layers.
Integrate painted light. Use standard OSL techniques to pre-map where the glow would hit, mentally projecting straight lines from the source and gradually lightening surfaces that face it. Keeping the light source as the brightest spot and darkening the surroundings slightly makes both the painted and the real glow read stronger in daylight and in darkness. OSL guidance emphasizes projecting straight lines from the source to decide which planes catch the strongest light. Then add a final selective glow coat only on the hottest spots, such as the center of an aura or the core of a weapon.
Finally, protect everything without cooking it. Use a clear acrylic varnish or medium you know plays well with your glow paint as a top layer, and let the piece cure at room temperature instead of forcing it with high heat. Store and display it away from harsh sunlight and hot windows, much like you would protect a luminous ceramic piece that uses glow glazes rated for specific firing temperatures and not for endless heat cycles afterward. Guidance for glow powders in ceramic glazes stresses respecting those temperature limits; the same mindset pays off for finished figures.
FAQ: Common Glow Frustrations
Why does my figure glow for only a minute or two?
Short-lived glow usually points to a combination of modest pigment loading and high ambient brightness. Craft- and fabric-oriented glow paints have been observed to produce a bright but very short-lived effect on models, especially when applied thickly and viewed in partially lit rooms, while more engineered systems like highway markings are formulated to deliver several hours of useful brightness in true darkness. Reports of fabric glow paints on models describe exactly that pattern: a quick flash that fizzles out almost immediately. Focusing the glow on larger, simpler shapes, charging fully, viewing in near-total darkness, and upgrading to paints that explicitly advertise longer afterglow can all stretch that window.
Why does my glow layer feel rough or look cloudy in daylight?
That gritty feel usually means the glow pigment particles are not fully encapsulated in the binder or have been packed too densely into a small area. Since glow powder is a relatively coarse mineral pigment, loading too much into a weak or thin binder leaves grain at the surface and can scatter light, making the area look cloudy instead of clear and bright. Mixing glow paints with an appropriate acrylic medium, applying thinner coats, and sanding and repainting only truly ruined sections can restore a smoother finish on future builds.
Why did my glow almost vanish after a summer on the windowsill?
Extended exposure to heat and strong light is a perfect recipe for fading. Data on glow powders show that sustained temperatures much above roughly 120-175°F can permanently damage their structure, and intense light accelerates both pigment and binder aging. Temperature-dependent performance tests demonstrate that chronic high heat gradually erodes brightness, even if the surface looks fine. A figure sitting in full sun behind glass spends months cycling through heat and UV, so moving glow-heavy pieces to shaded shelves and limiting their time in hot cars or attics is one of the simplest ways to keep the glow alive.
Closing
Glow paint on anime figurines is less a magic trick and more a negotiation with physics, materials, and how your room is lit. When you respect the limits of the pigments, layer them like the specialty coatings they are, and stack them on top of strong painted light, your collection starts to feel like a living shrine that slowly wakes up after dark instead of a row of disappointed "before and after" shots. Treat the glow as a rare highlight, not the whole show, and your favorite characters will reward you every time the lights go out.