Understanding Why Figurine Water Decals Experience Curling Edges
Figurine water decals curl when the film, surface, moisture, and clear coats fall out of balance; this guide explains what is happening and how to prevent and repair lifting edges on your figures.
You finally nail the perfect pupil decal on a garage-kit face, only to find one corner slowly lifting a day later like a tiny paper cut. Curling edges ruin the illusion, but collectors who dial in surface prep, water temperature, drying time, and clear coats can keep decals smooth through years of posing and dusting. This breakdown shows what is actually happening when edges curl and how to prevent and repair it on your own figures.
What Water Decals Do on Your Figures
Water decals, often called waterslide decals, are ultra-thin printed designs on special paper that release from a backing when soaked briefly in water and then slide onto a smooth surface such as plastic, resin, metal, or glazed ceramic. On a figure, that film becomes the eye print, faction logo, jacket emblem, or tiny warning text that would be impossible to paint consistently by hand.
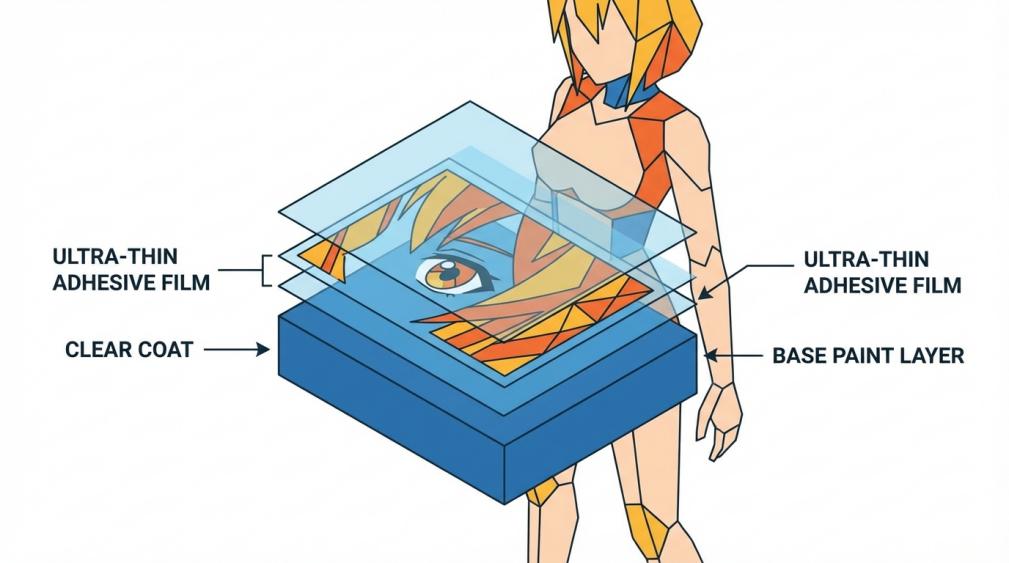
By design, this film is not inherently permanent; without a protective clear coat it stays vulnerable to moisture, abrasion, and skin oils. A figurine decal is really a sandwich: base paint or primer, a very thin adhesive film with the printed design, and then the clear layer you add on top. Curling edges almost always mean something in that sandwich is not bonding or curing evenly, so the film tries to pull back toward its original flat shape.
On anime figures and mecha kits, there is an extra challenge: decals often cross deep panel lines, exaggerated folds in clothing, or complex armor plates. That means the film has to stretch, soften, or be coaxed into curves it was never designed for, which magnifies tiny technique mistakes into visible lifting along the edge.
Why Figurine Decal Edges Curl Instead of Staying Flat
When figurine decals misbehave, it is rarely random bad luck. Most failures trace back to a repeatable mix of surface preparation, soak time and water temperature, application technique, and sealing—the same factors that cause waterslide problems on models, guitars, and ceramics. The sculpted curves and small contact patches on figures just make those issues show up faster.
The Surface Is Fighting the Decal
Decals want a surface that is smooth, clean, and slightly glossy; rough or matte surfaces trap microscopic air pockets under the film and give edges fewer places to grip. Scale modelers routinely apply decals over a smooth gloss varnish specifically to avoid those tiny pockets, and the same logic applies perfectly to an ABS or resin figure.
If you apply a decal straight onto raw, slightly textured plastic or a flat topcoat, air and leftover water collect in the microtexture. As that moisture slowly evaporates, you get the familiar frosty halo, and the edge can begin to lift because not enough adhesive is actually in contact with the surface. Basic surface prep from model and craft guides—washing the part to remove mold release and skin oils, letting it dry, and in some cases adding a thin gloss coat before decaling—dramatically increases the chance that the film lies flat and stays that way.
On a practical level, think about a shoulder armor plate covered with panel lines.
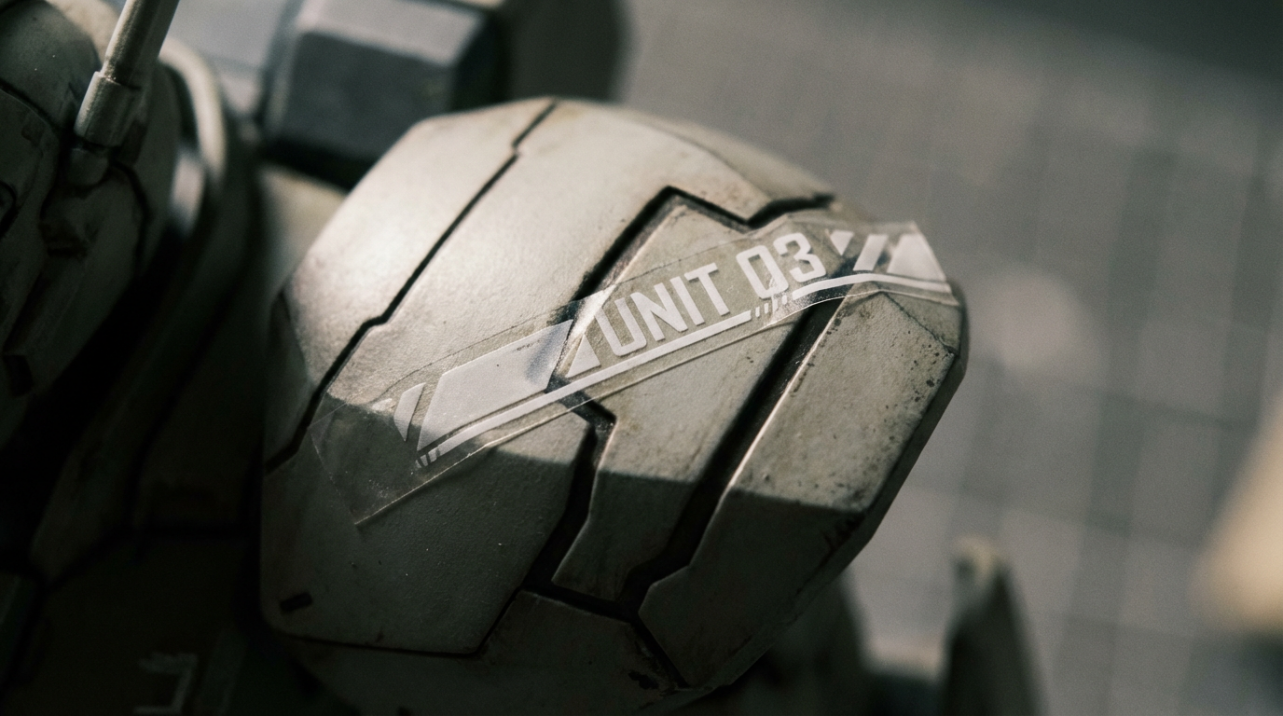
A decal placed directly on a flat paint layer will bridge those lines. Once it dries, the film tries to pull down into the grooves, but if there was no gloss there to help it slide and conform, the tension often shows up first as a lifting corner or a slight curl along the edge.
Water, Soak Time, and Temperature Overload the Film
Waterslide decals activate in a narrow window of soak time and water temperature, and pushing outside that window stresses the film. When users print their own designs, common failures come from soaking too briefly or too long and from water that is too cold or too hot, all of which show up as poor adhesion in guides on waterslide decals not sticking.
If the decal comes out of the water while the backing still grips hard, you are forcing the film off before the adhesive is fully ready. It tends to feel rubbery and resistant, and once you press it down, that internal tension can relax over the next few hours by lifting at the weakest spot—the edge.
At the other extreme, over-soaking the decal or using very warm water makes the film overly soft and stretchy.
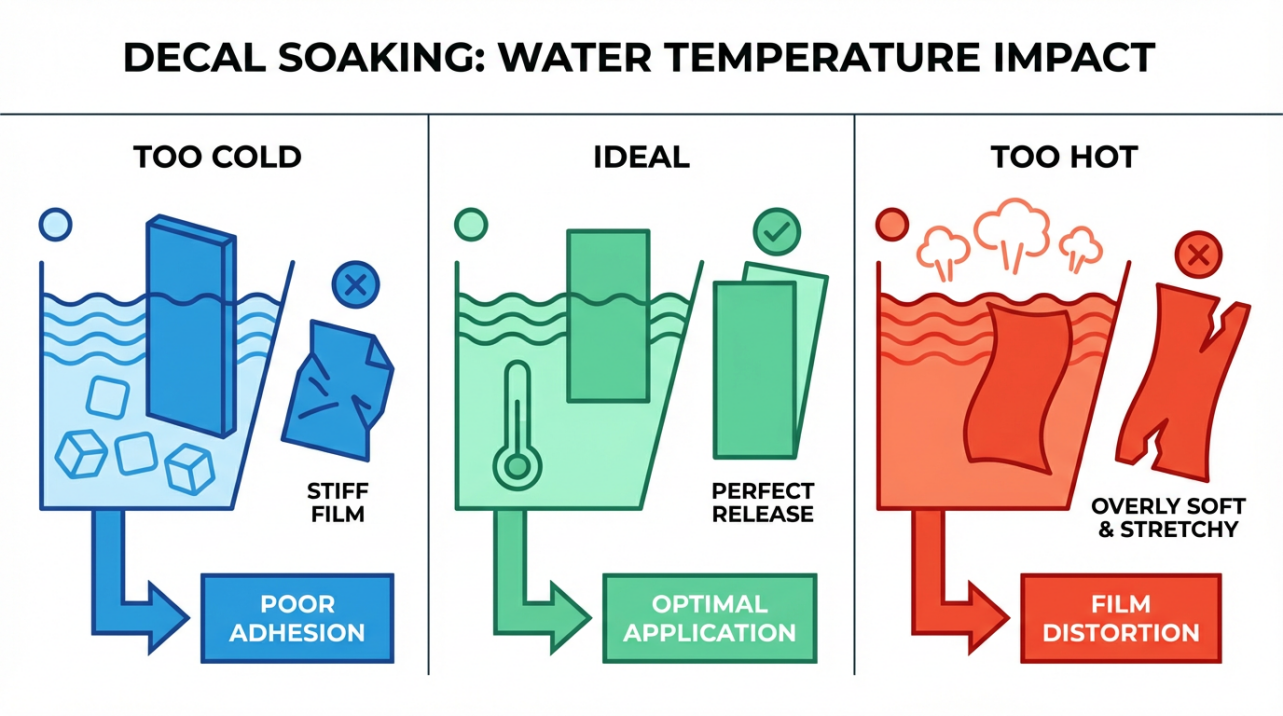
As it dries it can shrink slightly, and again the tension shows up as curling edges, especially on narrow bands like belts or sleeve stripes.
Most figure-friendly workflows sit in the middle: a quick dip or a short soak in lukewarm water until the image just begins to slide on the backing, followed by a brief rest on a paper towel so the adhesive goes from slimy to gently tacky. On custom figures, keeping soak times in that range drastically reduces the number of decals that start to curl while you are still posing them on the desk.
Moisture and Air Trapped Under the Film
Even if the water and surface are perfect, leaving trapped moisture or air under the film is asking for trouble. Waterslide guides consistently recommend sliding the decal into position, then pressing from the center outward to push out water and air, followed by patient drying before sealing, as shown in basic waterslide decal tutorials.
On a figure, it is tempting to nudge the decal around with a wet brush until it looks perfect and then move on immediately. The problem is that a glossy surface and gravity can let tiny beads of water pool under the edge. When those beads evaporate, there is a mini vacuum where the adhesive never made contact, and that empty pocket lets the film flex when it is bumped, which quickly becomes visible lifting.
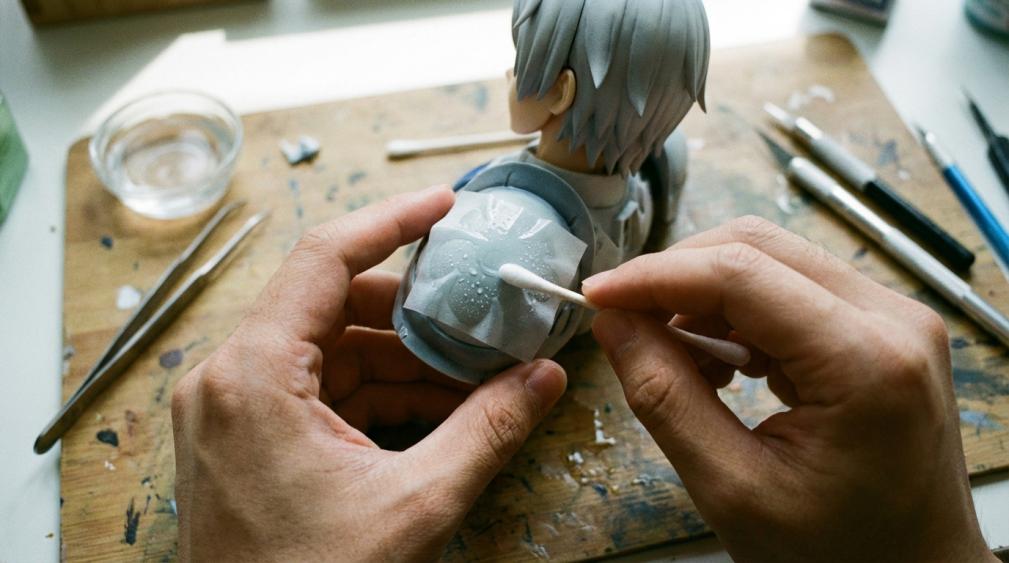
Modeling-focused guides describe using cotton swabs, older soft brushes, and paper towels to wick away moisture while gently rolling from the center toward the edge rather than scraping across it. That rolling motion is crucial on complex anime sculpts, such as a fluttering skirt or layered hair strand, because it coaxes the decal to hug the plastic instead of scraping the edge sideways and loosening it.
Sealers and Clear Coats Working Against You
Waterslide decals rely on some form of clear protection to become truly durable, and craft-focused explanations make it clear that the film stays vulnerable if you skip that step or use an incompatible coating on top of it. Overviews of waterslide durability note that a clear acrylic spray or dedicated decal sealant dramatically boosts resistance to water, scratches, and UV light, especially on high-use items like mugs and plates.
Where curling comes in is timing and chemistry. Tests of different clear sprays on inkjet waterslide paper have shown that if you dunk decals after only a few minutes of curing, the sealant can turn slimy, crack, or let water seep under the edges, while the same products perform well when given 24 hours or more to cure properly. On fishing rods, builders have also seen slow-curing epoxy finishes creep under unsealed decal edges and physically push them up as the epoxy levels and hardens, which is why they often pre-seal decal edges with a fast-drying clear and even clamp them under thread or tape as the adhesive sets.
For figurines, both patterns matter. If you spray a thick coat of strong lacquer or automotive clear over a fresh decal and a still-soft base coat, all those layers are shrinking and gassing off at different rates. As they tighten, the strongest layer pulls on the weaker one, and the tension most easily relieves at the decal’s thinnest point, which is usually the edge. Safer practice is to let decals dry completely, mist on very light coats of a decal-safe acrylic or hobby clear, and respect full cure times before long soaking tests or heavy handling.
Curves, Wraparounds, and Sculpted Details
Anime figures practically dare decals to curl by asking flat film to cover wild curves. Hobbyists who add logos to fishing rods have documented the same challenge and even suggest training decals by wrapping them around a dowel or marker for days so they learn a curve before application, advice shared in discussions of decal edges curling or lifting. When you wrap a straight decal around a circular forearm, thigh, or hair ribbon, the outer edge has farther to travel than the inner edge, so the film ends up under tension.
On wraparound graphics—like a band logo circling a mecha calf or a pattern wrapping a waist cape—that tension almost always accumulates where the two ends meet on the back side. If the decal was cut with a perfectly straight edge but the sculpt is slightly conical rather than a perfect cylinder, one side has to wrinkle or lift, and the adhesive can only do so much.
Practical fixes lean on three ideas.
First, cut large wrap decals into smaller arcs so each one has less distance to cover and can align more comfortably with the sculpt. Second, pre-curve tricky decals around a spare piece of sprue or a marker so they lose some of their memory as flat strips. Third, use a decal softener sparingly on folds and recesses so the film relaxes into the curve rather than fighting it, and avoid touching the decal while it looks wrinkled and rubbery; that ugly phase is when it is actually conforming and will dry back down smooth.
Age, Paper Quality, and Handling
Even perfect technique cannot fully override the quality and age of the decal paper itself. Explanations of waterslide durability underline that lifetime depends heavily on paper and ink quality, surface type, environmental exposure, and sealing, with well-sealed decals lasting for years while poorly protected examples fail much sooner. On nail art, which is a very high-abuse environment, water decals that are applied properly, not over-soaked, and sealed with top coat can still last up to about two weeks of daily washing and wear before breaking down, as described in an overview of water decals for nail designs.
For figures, the stakes are lower in terms of washing but higher in terms of time. Home-printed sheets that have sat in a warm drawer for years can develop brittle film or partially dried adhesive that cracks instead of stretching. Very cheap papers may have carrier films that are thicker or less flexible, making them more prone to edge lift on sharp curves. Even good decals slowly age under direct sunlight or on shelves that swing between hot and cold, which stresses the clear coat and the film underneath.
This is why it is smart to test one spare decal from any old sheet on a hidden area or a piece of scrap plastic before committing it to a limited-run figure. If that test decal curls, cracks, or silvers badly even with decent technique, the problem is likely in the material, not your workflow.
Practical Workflow To Keep Anime Figure Decals Flat
The good news is that you can stack the odds in your favor with a workflow that respects what the film needs at each stage. Many general waterslide tutorials outline the same core sequence—prep, soak, slide, smooth, dry, seal—and figure work simply tweaks that rhythm for curved, painted surfaces rather than flat cups or signs.
Start by cleaning the target area thoroughly with mild soap and water or rubbing alcohol, then let it dry completely so there is no oil or dust left to weaken adhesion. If the area is very matte or textured, add a thin gloss clear coat and let it cure, turning the sculpted armor plate or skirt panel into the kind of smooth base decals love. When you are dealing with raw resin or 3D-printed parts, that gloss layer also helps lock down any remaining microtexture.
Next, cut the decal as close to the printed design as you comfortably can, rounding off sharp corners so there are fewer delicate points that can catch and lift later. For decals that will wrap around an arm, thigh, or neck, loosely pre-wrap the dry decal around a marker, dowel, or piece of sprue in the same diameter range and hold it there with a soft band for a few days so the film relaxes into a gentle curve. This simple habit, borrowed from rod builders who fight similar edge lift on cylinders, makes a surprising difference on figure limbs and flowing hair ribbons.
When you are ready to apply, use lukewarm water in a shallow dish and watch the decal, not the clock. Many modelers use something in the range of a few seconds to around half a minute depending on the brand; the key is to wait until the image slides on the backing with very light pressure rather than swimming off on its own. Let the wet decal rest briefly on a paper towel until the backing feels damp but not dripping, then bring it to the figure and slide it into place on a slightly wet, glossy surface with a brush or tweezers.
Once positioned, stop swimming the decal around. Instead, gently roll a cotton swab, soft brush, or folded paper towel from the center of the image out toward the edges, pushing out trapped water and air the same way general waterslide tutorials recommend for flat surfaces. If the sculpt has deep folds or panel lines, wait until the decal grips slightly, then touch decal softener only where needed and leave it alone while it wrinkles and re-flattens as it dries. Overnight drying is ideal; rushing this step is a common reason edges crawl up later.
After the decal is bone dry, seal it with several light mists of a clear coat that you know plays nicely with both your paint and your decals. Explanations of decal permanence stress that proper sealing and full cure time are what turn fragile film into a long-term finish, with clear coats dramatically improving resistance to water and abrasion when given time to harden. Spray from farther away than you think for the first pass so you are dusting the surface rather than soaking it; that mist coat gives the film a chance to grab onto tiny dots of clear before you lay down slightly wetter coats. Finally, respect the manufacturer’s cure time before handling the figure heavily or exposing it to heat and humidity; what feels dry to the touch at an hour can still be shrinking and tugging on edges for a day or more.
Quick Reference: Curling Symptoms and Fixes
Curling situation on a figure | Likely cause behind the scenes | Best way to prevent it next time | Emergency rescue on an existing piece |
|---|
Edge lifts within a day along a curved armor plate or sleeve stripe | Matte or slightly rough surface plus trapped air and tension from the curve | Wash the part, add a thin gloss coat, pre-curve the decal, then press moisture out from the center before letting it dry overnight | Carefully wick a little decal softener under the edge, roll it down with a cotton swab, let it dry completely, then re-seal with light clear coats |
Edge curls while the decal is still drying, especially after a long soak | Over-soaked decal or water that is too warm, which stretches and weakens the film | Use lukewarm water, watch for the first sign of sliding, and avoid leaving the decal in the water longer than necessary | If the film is still movable, slide it off and replace it with a fresh decal; if it has set, you may need to trim the worst curl and disguise it with shading or weathering |
Edge lifts right after clear coat or days later with no handling | Strong or under-cured clear coat shrinking over a still-soft decal, or liquid seeping under unsealed edges | Let decals dry at least overnight, mist on very light first passes of a decal-safe clear, and allow full cure time before stress or heat | Gently lift the loose section just enough to wick in clear acrylic or setting solution, press it flat under soft pressure, and touch up the clear coat once everything has dried hard |
FAQ
Can you fix a decal that is already curling on a finished figure?
Mild curling where the rest of the decal still looks good is often salvageable. Use a sharp needle or hobby blade to make a tiny opening where the edge is lifting, then wick a drop of clean water or decal setting solution underneath and gently roll the film down with a cotton swab. Once it dries flat, add a couple of very light clear coats over the area and let them cure fully so the rescued edge is locked in place.
If the curl is severe, the film cracked, or the print itself has distorted, it is usually better to remove that decal entirely and start fresh. Waterslide how-tos point out that fully dry decals can be softened and lifted with water, clear remover, or careful sanding before repainting and re-decaling the area, which is far less distracting than a permanently wrinkled logo sitting front and center on a chest plate.
Are waterslide decals durable enough for frequently handled figures?
With good surface prep and sealing, waterslide decals can last for years even on objects that see regular use, as shown by their performance on mugs, plates, and similar items when paired with appropriate sealants. They are not indestructible, though, and will eventually fail faster if exposed to frequent flexing, direct sunlight, and skin oils. For figures that you handle often, it helps to seal decals under a clear coat that matches the surrounding finish, pose the figure by gripping the base or hair rather than the printed area, and dust with a soft brush instead of rubbing.
On display-only anime statues that live on a shelf away from windows, properly applied and sealed decals on eyes, emblems, and clothing should stay flat and vibrant for a very long time. When one does start to lift, treating it as a repair project rather than a disaster keeps your display looking like a story universe instead of a graveyard of experiments.
A smooth, obedient decal is one of those tiny details that makes a figure feel like it stepped off the screen and onto your shelf. Once you tame curling edges with better prep, water control, and smart sealing, every logo, eye, and warning stencil becomes another little piece of worldbuilding in your collection.