ZBrush vs Blender for Beginners: Launching Your First Anime Figurine Sculpt
If you are the kind of fan who pauses an opening sequence to admire the folds in a cape or the shine on a mecha joint, sooner or later you get the itch to make your own figure. Not just kitbashing a model someone else made, but sculpting your favorite character, posing them exactly the way you see them in your head, and maybe even 3D printing a little shrine for your desk.
Two names show up over and over when beginners look for serious 3D modeling tools: ZBrush and Blender. Both can take you from blank canvas to fully armed waifu, but they do it in very different ways. The question is not “Which is better in general?” but “Which one fits you as a beginner, your budget, and your fandom goals right now?”
In this guide, I will walk through ZBrush and Blender the way a figurine-obsessed fan actually uses them, then connect that to what trusted reviewers and 3D-printing pros report in their own testing. By the end, you should have a clear, realistic path for your first anime sculpt.
Sculpting, Modeling, and CAD: What Are We Even Doing?
Before we compare ZBrush and Blender, it helps to know what type of 3D work you actually want to do.
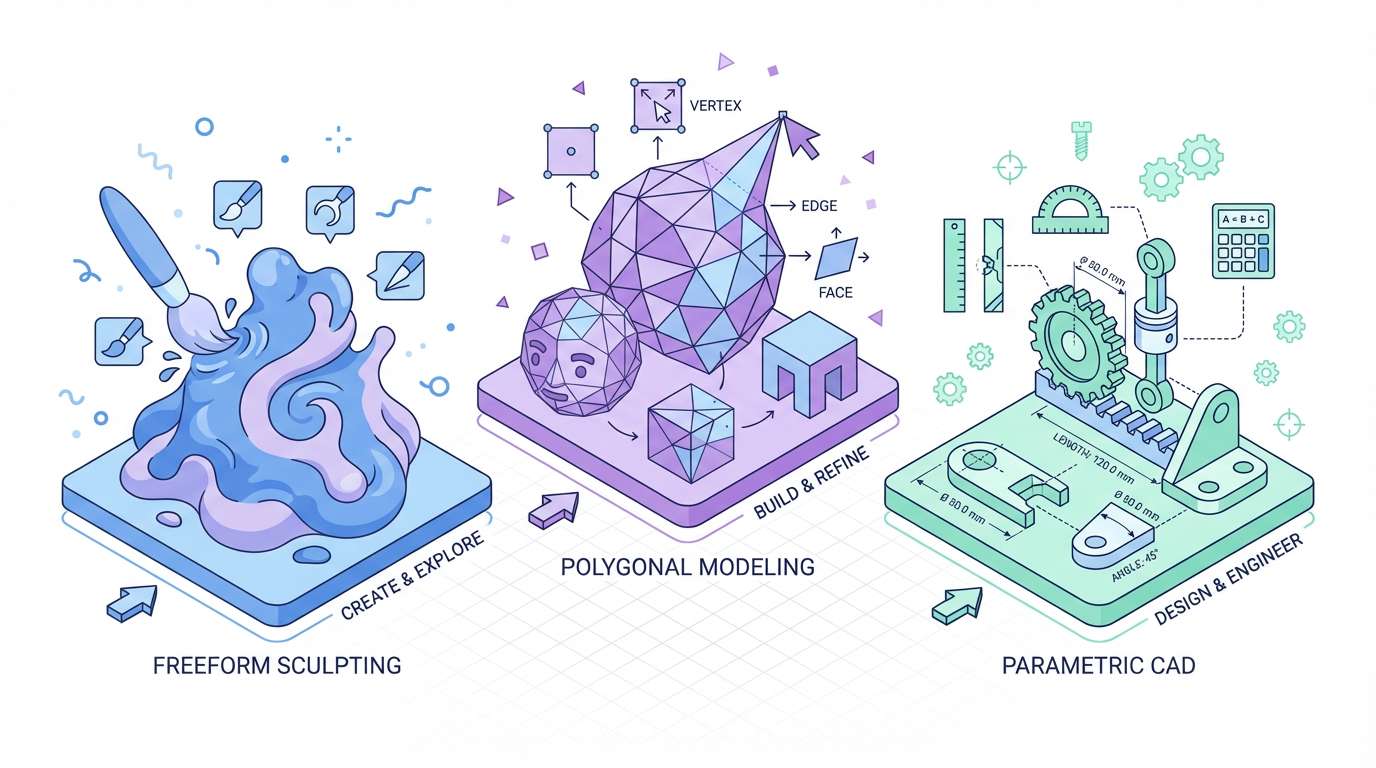
Sources like Formlabs explain that “3D modeling” is a big umbrella: sometimes it means precise, parametric CAD for engineering, and sometimes it means freeform sculpting that feels like digital clay. Formlabs and Autodesk both describe several approaches:
Freeform sculpting is what tools like ZBrush specialize in. You push and pull a surface like clay with brushes. It is perfect for organic shapes: faces, hair, clothing folds, creature anatomy, and all those swirly armor ornaments anime loves. It is not great for exact dimensions or mechanical parts that must fit a real screw.
Polygonal or mesh modeling is what most DCC (digital content creation) apps do by default. Blender, Maya, 3ds Max, and similar tools let you work with vertices, edges, and faces, stretching and extruding them into shape. This works for hard surfaces like weapons and mecha as well as characters. Blender also layers sculpting tools on top of this.
Solid and parametric modeling is the CAD world: SolidWorks, Fusion 360, FreeCAD, and similar tools treat models as precise solids driven by dimensions and constraints. They are fantastic for engineering and functional 3D prints, but much less natural for a flowing anime cloak.
For anime figurine work, you are mostly in the freeform sculpting and polygon modeling zone. You want believable anatomy and drapery, but you still need print-safe thickness and the ability to cut parts for assembly. That is exactly where Blender and ZBrush intersect.
Meet Blender: The Free All-Rounder That Fandom Loves
Blender comes up so often in beginner conversations that at this point it is almost a rite of passage. Multiple independent guides, including those from TechRadar, Creative Bloq, G2, and several 3D-printing blogs, all agree on a few core facts.
Blender is completely free and open source. There are no license fees and no restrictions on selling your work. G2 describes it as a full 3D creation suite: modeling, sculpting, animation, VFX, physics, rendering, even video editing. Creative Bloq and TechRadar both call it the best free 3D option, and TechRadar notes that modern long-term support releases such as version 4.5 are stable enough for serious production work.
It has a steep learning curve. Almost every serious review repeats this. The interface is dense, there are many overlapping features, and the keyboard shortcuts feel like a foreign language at first. Several educators and community posts emphasize that Blender is powerful enough that most users will never touch every tool.
It has a gigantic, passionate community. That is not marketing fluff. Social posts from professionals who normally live in Maya or other paid tools still tell beginners to “definitely try Blender.” They point out that Blender has an enormous plugin ecosystem and more tutorials than almost any other 3D package. Guides on beginner modeling from studios and bloggers routinely recommend Blender as the deep end of the pool once you are ready to move beyond browser tools like Tinkercad.
Perhaps the most telling detail comes from multiple anecdotal reports: some artists now use Blender as their only modeling tool for 3D printing, and it “works great” for them. Others use it daily to plan woodworking projects, which means it is not just for flashy renders but also for practical fabrication.
In other words, Blender is the “shonen protagonist” of 3D tools: rough around the edges at first, but endlessly trainable and strong enough to stay with you for years.
Meet ZBrush: The Industry’s Digital Clay for Organic Detail
Where Blender tries to do everything, ZBrush is obsessed with one thing: sculpting.
Creative Bloq names ZBrush as the best 3D software for digital sculpting and high-detail modeling. TechRadar and several 3D-printing guides agree: ZBrush is the go-to when you want dense, organic detail, such as character faces, hair strands, creature scales, and the ultra-crisp surface detail you see on high-end collectible statues.
Several consistent traits show up in independent reviews and 3D-printing guides.
ZBrush uses a virtual clay workflow. Instead of thinking in terms of boxes and extrusions, you think in terms of brushes. You push, pinch, inflate, carve, and polish your model. It feels more like traditional sculpting. Formlabs classifies this as freeform sculpting, ideal for organic shapes and less ideal for dimension-critical mechanical parts.
It handles millions of polygons. Creative Bloq points out that ZBrush can work comfortably with extremely dense meshes, painting textures and creating UV maps while still staying responsive. A 3D-printing focused guide notes features like dynamic tessellation and tools such as ZRemesher that help manage this density by rebuilding topology.
It has specialized 3D printing helpers. An article aimed at 3D-printing workflows describes a “3D Print Hub” in ZBrush that prepares meshes for printing, checking wall thickness and helping with export. For figurine makers, this is valuable because anime sculpts tend to have fragile elements like hair strands, ribbons, and weapon tips.
The interface is notoriously unusual. Multiple reviewers warn that ZBrush has a non-standard, convoluted interface. TechRadar describes it as overwhelming for beginners, and Creative Bloq calls out a steep learning curve. Almost everyone recommends using a pressure-sensitive tablet for best results, since ZBrush is optimized for that brush-driven workflow.
Pricing depends on the edition. According to Creative Bloq and TechRadar, full ZBrush on desktop costs roughly $399 to about $400 per year on subscription, with an iPad version around $90 per year. Another source notes that pricing for licenses and bundles can reach up to about $895 in some cases. For beginners, there is ZBrush Core, a trimmed-down version around $9.99 per month that still delivers professional-grade digital sculpting but with fewer advanced features.
ZBrush is the classic “SSR rarity” tool in the 3D world: focused, powerful, and built to push organic detail to the limit. It is no accident that many professional anime-style PVC and resin figures start in ZBrush or a similar sculpting tool.
Beginner Experience: How Each Tool Feels When You First Open It
Imagine you just downloaded both tools after binge-watching a mecha series, and you are determined to sculpt your own pilot in their plug suit. What happens when you open each program?
With Blender, your first impression is usually information overload. There are multiple editors, sidebars, and mysterious panels. A lot of beginners feel intimidated and some bounce off it at least once. However, because Blender is the center of gravity for free 3D education, you are no more than a search away from detailed beginner series that walk you through your first model, your first sculpt, and your first render.
Several teaching-focused articles point out that the hardest part is the first few hours. Once you learn navigation and a handful of core shortcuts, Blender becomes a lot more predictable. It also rewards you beyond just figurines: you can animate your character, build an environment, or even make a short fan animation without leaving the app. Community posts emphasize that skills learned in Blender transfer well to other 3D tools, because the underlying concepts are the same.
In ZBrush, the emotional arc is different. You open it and the interface looks alien, but the sculpting action itself is surprisingly intuitive. When you drag a brush across the model and see it behave like clay, your brain instantly recognizes the metaphor. That is why many sculptors say ZBrush “feels” right, even when the menus do not.
The catch is that ZBrush expects you to already have a decent sense of form. If you are still learning basic anatomy, gesture, and proportion, you can easily get lost in wrinkles and hair strands before the overall pose works. The tool invites detail, which can be a trap for beginners.
Both tools are described in multiple reviews as having steep learning curves. The difference is that Blender’s difficulty comes from breadth and UI complexity, while ZBrush’s difficulty comes from depth and its own unique interface conventions. As a beginner, your personality matters: are you the type who likes a Swiss Army knife you can grow into, or do you want a specialized chisel that does one thing beautifully?
Cost, Licensing, and Hardware Reality Check
From a beginner’s wallet perspective, Blender is hard to argue with. Across sources from TechRadar, Creative Bloq, G2, and numerous blogs on “best free 3D software,” the consensus is consistent: Blender is fully free and open source. You can download it, use it for any purpose, and sell your models without license headaches.
ZBrush is a paid tool with multiple price points. Reviews from Creative Bloq, TechRadar, and 3D-printing guides place its desktop subscription near $399 to about $400 per year, with some packages or versions reaching up to roughly $895. The iPad version is around $90 per year after a short trial. ZBrush Core, aimed at hobbyists, lands near $9.99 per month and keeps most of the core sculpting essence while dropping some advanced features.
For many beginners, especially students and hobbyists, that cost difference is decisive. Several practitioners mention that they originally learned expensive tools like 3ds Max or Maya in school but later had to adopt Blender because they could not justify the ongoing licenses. With Blender, the software never becomes an obstacle when you take a break and come back later.
Hardware is another practical constraint. TechRadar notes that 3D tools, especially those used for detailed CGI, are resource-intensive. For basic Blender work, they suggest at least a mid-level system such as a machine in the range of an Intel Core i5 with a dedicated GPU and at least 8 GB of RAM. More RAM and a stronger GPU help significantly, especially when working with heavy scenes or high-resolution sculpting. ZBrush is heavily CPU-based and optimized for sculpting, but once you push into millions of polygons and high-resolution textures, it also appreciates a capable machine and ample memory.
If you are on a modest computer and want to test the waters, starting with Blender is the safer bet. You can see whether your current hardware can handle basic sculpting and rendering before considering an additional investment in a paid, sculpt-only tool.
Anime Character Sculpting in Blender: What It Is Like
Blender is not just a polygon modeler that happens to have sculpting on the side. As several software overviews from Creative Bloq, TechRadar, and multiple beginner-focused blogs point out, Blender includes a full sculpt mode and brushes that feel very close to dedicated sculpting tools for many tasks.
For anime-style characters, a typical beginner-friendly path in Blender looks like this. You start with a simple base mesh, either a sphere or a low-poly mannequin. You jump into sculpt mode, turn on symmetry, and rough in the proportions: head-limb ratio, gesture, big hair masses, and the general silhouette. At this stage you are not chasing detail; you are trying to make the pose look like it stepped out of a key frame.
Once the pose reads well, you gradually increase resolution with features like dynamic topology or multiresolution modifiers and start defining planes of the face, folds in clothing, and mechanical details on accessories. Because Blender combines sculpting with regular mesh modeling, you can model a sword, staff, or gun with more rigid poly modeling tools and then blend that into the sculpted character. That hybrid approach matches what Formlabs describes as modern hybrid modeling systems: mixing sculpting and polygonal workflows to fit the project.
One of Blender’s hidden strengths for figurine artists is that you can take your model further than just a sculpt. You can rig it for animation, pose it for renders, or build a simple environment around it. TechRadar and Creative Bloq both highlight Blender’s strong rendering options (Eevee for real-time, Cycles for photoreal), so you can create promo images of your character before you ever start 3D printing.
The downside is that Blender will happily distract you. Once you see particle systems for hair, fluid simulations, or camera tracking, it is easy to wander off into every cool feature instead of mastering sculpting fundamentals. That is where discipline and clear goals matter: if your priority is a printable anime figure, stay focused on clean topology, print-safe thickness, and simple but appealing posing.
Anime Character Sculpting in ZBrush: What It Is Like
Sculpting an anime character in ZBrush feels more like working in a professional character shop.
You begin with a primitive or a base human model and immediately start pushing clay around with brushes. ZBrush’s brush engine is one of its biggest strengths, and reviews from Creative Bloq and TechRadar emphasize how well it responds to pen pressure on a tablet. You can lay in cheekbones, eyelids, and subtle forms very quickly, then step up to insane levels of detail when you are ready.
For anime figures, this depth shows up in places like hair and clothing. ZBrush’s ability to handle huge polygon counts lets you carve individual hair strands, tiny fabric wrinkles, and engraved patterns on armor without the software choking. A 3D-print-focused article highlights dynamic tessellation and automatic retopology tools like ZRemesher that help keep this under control, as well as utilities like 3D Print Hub that check wall thickness and prepare solid meshes for fabrication.
The sculpting-first mindset is also its weakness for beginners. Where Blender naturally nudges you to think about scenes, rigging, and animation, ZBrush is a pure sculpting environment. If you want to pose a character, create different outfits, or build an environment around them, you typically end up exporting to another tool for those steps.
For a beginner whose goal is “I just want to make a bust of my favorite character as a 3D print,” ZBrush can be magical. The tactile feel of brushes and the high-resolution detail reward your time directly. However, the financial cost and the complexity of the interface mean it is rarely the first stop. ZBrush shines either when you are absolutely sure sculpting is your main passion, or when you are upgrading from free tools after hitting their limits.
3D Printing Your Figurines: Pipeline Differences
Because many readers care about holding a physical figure, not just a render, the 3D-printing pipeline matters.
Blender has a strong track record in hobbyist printing circles. Several community posts mention users relying exclusively on Blender for their entire 3D printing workflow. You can model, check for non-manifold geometry, and export STL files directly. Blender does not have a dedicated “3D Print Hub” built in the way ZBrush does, but with add-ons and some basic checks, it is perfectly capable of producing print-ready meshes. 3D-printing guides that list the best software for printing repeatedly include Blender as a top free option for advanced printable models.
ZBrush approaches printing with a more specialized toolkit. ZBrush-focused printing guides describe dedicated features for ensuring watertight meshes, consistent wall thickness, and correct scaling. The 3D Print Hub plug-in can automate common checks and handle export for popular printer formats. This fits with the way TechRadar and Creative Bloq position ZBrush: as a sculpting powerhouse that can take a high-detail character and get it ready for fabrication with minimal compromise.
In practice, many figure makers adopt a hybrid approach. They might sculpt high-detail characters in ZBrush, then export to Blender or a CAD tool for final part cutting, peg design, and assembly planning. As a beginner, you do not need this full pipeline on day one. It is enough to know that both tools can produce printable models, but ZBrush leans into sculpting and print prep, while Blender gives you modeling plus an entire ecosystem around rendering and animation.
Community, Education, and Long-Term Growth
The educational dimension is not just a nice extra; it affects how quickly you improve and how fun the journey feels. Research on 3D modeling in education summarized by academic sources notes that 3D tools build spatial reasoning, problem solving, design thinking, and technical skills. The same applies to hobbyists: the more you play in 3D, the more your brain rewires around volume, form, and structure.
Blender is the clear winner on community size and learning resources. Multiple sources, from G2’s analysis of user reviews to posts from working professionals, emphasize that Blender has a vast library of tutorials, courses, and community assets. YouTube, streaming platforms, and forums are overflowing with Blender-specific content that ranges from beginner-friendly introductions to deep dives on sculpting anime hair.
There is also a strong peer teaching culture around Blender. In teachers’ reports on using 3D tools in classrooms, web-based platforms and free software are recommended so students can continue at home. Blender fits that requirement and is regularly named as the “serious” next step after browser tools like Tinkercad.
ZBrush has its own ecosystem of professional-level tutorials and masterclasses, many of them excellent. However, because the software is paid and targeted more at professionals, there is less of that informal, beginner-friendly content swirling around social media. You will still find plenty of ZBrush anime sculpt breakdowns, but you often encounter them after you already know the basics.
For a beginner, especially a younger fan or a student, the sheer density of Blender learning material can be the difference between giving up and leveling up.
Side-by-Side Snapshot for Beginners
Here is a concise view of how Blender and ZBrush compare from a beginner figurine-maker’s perspective, based on the sources cited above.
Aspect | Blender | ZBrush |
|---|
Core focus | All-round 3D suite: modeling, sculpting, animation, rendering | Dedicated digital sculpting and high-detail organic modeling |
Cost | Free and open source | Paid; roughly a few hundred dollars per year, with cheaper Core edition |
Learning curve | Steep due to breadth and interface density | Steep due to unique interface and depth of sculpting tools |
Best for | Beginners who want a complete, flexible tool and zero fees | Users focused on character and creature sculpting with extreme detail |
3D printing workflow | Proven in hobby workflows; exports STL and other formats | Specialized tools like 3D Print Hub for print prep |
Community and tutorials | Very large, many free tutorials and add-ons | Strong but more professional; less beginner-focused free content |
Hardware expectations | Needs at least a mid-range PC; better with more RAM and GPU | Highly responsive for sculpting but benefits from strong CPU and RAM |
Future growth potential | Easy to branch into animation, VFX, environments | Excellent for sculpt depth; usually paired with other tools for extras |
So Which Should You Start With?
Here is the honest answer, grounded in both personal experience and what multiple independent sources say: for most beginners, Blender is the better starting point; ZBrush is the upgrade when you know sculpting is your main path.
Blender gives you a complete playground for zero dollars. Guides from TechRadar, Creative Bloq, G2, and 3D-printing blogs all agree that it is the most capable free option, with a full pipeline and a huge community. The learning curve is real, but you are never alone, and your skills transfer well if you later move into other 3D packages.
ZBrush, on the other hand, is the weapon of choice when your priority is organic detail and you are comfortable investing money in that focus. Reviews consistently praise its ability to handle massive polygon counts, its brush feel, and its dominance in character and creature sculpting, including toys and action figures. For a figurine fan, ZBrush is what you eventually want to master if high-end, ultra-detailed statues are your endgame.
A practical path looks like this. Start with Blender, learn navigation and basic sculpting, and complete a small project such as a chibi bust or a simple 3D-printable head. Use this phase to test your hardware, your patience, and your genuine interest. If you find yourself losing sleep because you are obsessing over eyelids and hair locks, and you are ready to double down on sculpting as a craft, that is when investing in ZBrush or ZBrush Core starts to make sense.
The key is not which logo is on your taskbar, but whether the tool keeps you coming back to sculpt one more fold of cloth or refine one more expression. Anime figures are built pose by pose, stroke by stroke. Pick the software that makes you eager to open it tomorrow.
Quick FAQ for Figurine-Focused Beginners
Q: If I can only pick one, should I choose Blender or ZBrush first as a beginner? A: For almost everyone starting out, Blender is the better first choice. It is free, has a huge community, and covers everything from sculpting to rendering, so you can learn the full pipeline. Once you know you are serious about detailed character sculpting and can justify the cost, you can add ZBrush later.
Q: Is Blender good enough for serious anime-style figures and 3D prints?
A: Yes. Multiple 3D-printing enthusiasts report using Blender as their only modeling tool for printing, and professional roundups consistently include Blender as a top option for printable models. You will need to learn good practices for watertight meshes and wall thickness, but the tool itself is fully capable.
Q: When does ZBrush start to matter for anime figurines?
A: ZBrush becomes important when you are chasing very fine surface detail and working with dense meshes that push free tools to their limits. If you want to match the micro-detail you see on high-end commercial statues, the sculpting feel and performance of ZBrush can give you an edge.
Q: Do I need a drawing tablet for either tool?
A: You can learn the basics with a mouse, especially in Blender, but reviews and professional experiences strongly suggest that a pressure-sensitive tablet makes sculpting in both Blender and ZBrush far more natural. For ZBrush in particular, tablets are considered part of the expected workflow.
When you line up your favorite figures on a shelf, you are really looking at thousands of tiny decisions a sculptor made: where to place a wrinkle, how sharp to cut a fold, how much tilt to give a head. Blender and ZBrush are just the brushes; your fandom is the fuel. Start where the barrier is lowest, learn to love the process, and upgrade your tools when your passion demands it. The day your own character joins your figure lineup is worth every late night in front of the viewport.
References
- https://www.academia.edu/129090895/3D_MODELLING_AND_ITS_USE_IN_EDUCATION
- https://www.eecs.berkeley.edu/~sequin/CS285/PAPERS/Farrimond_ChurchBuilder.pdf
- https://academictech.uchicago.edu/2024/03/01/explore-3d-technologies-in-higher-education-qlone-and-metashape/
- https://www.unthsc.edu/center-for-innovative-learning/wp-content/uploads/sites/35/2018/10/Thigverse.pdf
- https://ejournal.upi.edu/index.php/SEICT/article/viewFile/72949/28027
- https://www.freecad.org/
- https://learn.g2.com/best-3d-modeling-software
- https://www.selfcad.com/
- https://www.tinkercad.com/
- https://www.3daistudio.com/blog/top-6-affordable-3d-modeling-software-for-beginners-and-pros